VPN for access to the MEDPSYCH network from outside network/file server/cluster/RemoteDesktop (alteHNO): Difference between revisions
No edit summary |
|||
| (14 intermediate revisions by the same user not shown) | |||
| Line 1: | Line 1: | ||
==== Windows OpenVPN Client | == '''! NEW VPN !''' == | ||
=== Windows 10 === | |||
* Please click on the network symbol in the taskbar, and on "network and internet settings". It is different if you are connected to a Wifi on the right: | |||
[[File:win10_01_network_settings_en.PNG]] | |||
[[File:win10_01_network_settings_de.PNG]] | |||
* Select "VPN" and click on the "+" to "Add a VPN connection": | |||
[[File:win10_02_add_vpn_en.PNG]] | |||
* Please fill in following settings: | |||
{| class="wikitable" | |||
|- | |||
| VPN provider || Windows (built-in) | |||
|- | |||
| Connection name || MP VPN | |||
|- | |||
| Server name or address || mps-115-104.medizin.uni-tuebingen.de | |||
|- | |||
| VPN type || Secure Socket Tunneling Protocol (SSTP) | |||
|- | |||
| Type of sign-in info || User name and password | |||
|- | |||
| Username || ''Fill in your MP Account username'' | |||
|- | |||
| Password || ''Fill in your MP Account password'' | |||
|} | |||
[[File:win10_03_create_vpn_en.JPG]] | |||
* Save your VPN settings and close the settings window. Now you can connect to the MP VPN by simply clicking the Connect button if you open the network icon again: | |||
[[File:win10_04_connect_vpn_en.PNG]] | |||
''' That's it. You are now sucessfully connected to MP VPN! | |||
--- | |||
====''Helpfully tools (optional)==== | |||
* You can create a desktop icon for your VPN Connection using the command ''rasphone.exe -d "MP VPN"'' | |||
* In case you want to see the network connection in your taskbar you can install the following tool (is an older one but it still runs under Windows 10) | |||
https://www.majorgeeks.com/files/details/vpn_connection_indicator.html | |||
--- | |||
==== How I connect to my computer ==== | |||
If you want access to your office computer via Remote Desktop, then we must activate it for you.<br> | |||
Send your computer name to [mailto:support-mp@medizin.uni-tuebingen.de support-mp@medizin.uni-tuebingen.de] (you find your computer name on a red label) | |||
# start remote desktop | |||
#: [[file:RDP MP.jpg]] | |||
# type your computer name in this field | |||
# click connect | |||
# you can login with your account | |||
#: <span style="background:#e0e0e0"> Login: medpsych\ [login] </span> | |||
#: <span style="background:#e0e0e0"> Password: [your password] </span> | |||
#: [[file:RDP login alteHNO.jpg ]] | |||
--- | |||
=== Linux Debian/Ubuntu === | |||
coming soon | |||
--- | |||
=== Mac OSX === | |||
* Click on your network symbol in the taskbar. And then on "Open Network Preferences..." | |||
[[File:macos_01_network_settings.png]] | |||
* Now click the small "+" symbol to add a new connection: | |||
[[File:macos_02_add_vpn.png]] | |||
* Here select "Interface", "VPN Type" like below and name it MP VPN. Then click on "Create": | |||
[[File:macos_03_vpn_type.png]] | |||
* Now enter the server address: mps-115-104.medizin.uni-tuebingen.de and your Medpsych username: | |||
[[File:macos_04_vpn_settings.png]] | |||
* Click on the same page on "Authentication Settings" and enter your Medpsych Password and use for the "Shared Secret": vpn2mp | |||
[[File:macos_05_vpn_auth_settings.png]] | |||
* Click OK in the Authentication Settings and open the "Advanced" page. Check here if the checkbox "Send all traffic over VPN connection" is checked. If not click it once. Then click on OK. | |||
[[File:macos_06_vpn_settings_advanced.png]] | |||
* Apply all settings. And then you can click on the "Connect" button to connect to the MP VPN. | |||
[[File:macos_07_connect_vpn.png]] | |||
''' That's it. You will see a the State: "Connected" at the top. You are now sucessfully connected to MP VPN! | |||
===''Name resolution (optional)=== | |||
*''If you need name resolution inside the MP network to use DNS names of servers instead of IPs, you have to add the MP search domain to the vpn connection. | |||
*''Disconnect from VPN and go to the Advanced page and click on DNS. | |||
*''There you can add on the right side with the small "+" icon an new search domain. Enter: medpsych.uni-tuebingen.de | |||
*''Click on ok and you should be able to connect again to the MP VPN, now address resolution should be possible. You can use server names instead of just IPs now. | |||
--- | |||
=== Other Operating Systems === | |||
CIN VPN is also possible on other operating systems. Please check out the manuals here and use the settings from MacOS above (Shared Secret is always: vpn2mp): | |||
[https://www.softether.org/4-docs/2-howto/9.L2TPIPsec_Setup_Guide_for_SoftEther_VPN_Server/2.iPhone_iPad_L2TP_Client_Setting VPN on iPhone] | |||
[https://www.softether.org/4-docs/2-howto/9.L2TPIPsec_Setup_Guide_for_SoftEther_VPN_Server/3.Android_L2TP_Client_Setup VPN on Android] | |||
== old VPN == | |||
=== Windows OpenVPN Client === | |||
Choose the setups for your Windows | Choose the setups for your Windows | ||
| Line 5: | Line 123: | ||
* for MAC OS -> MP-FW1-TCP4-1194-Viscosity.visc | * for MAC OS -> MP-FW1-TCP4-1194-Viscosity.visc | ||
https:// | https://mps-115-100.medizin.uni-tuebingen.de/index.php/s/ESOP5bQMRcopd2r | ||
Install the client with double click. After installation of the client, you can start your client and you will see the icon of your openvpn in the taskbar. | Install the client with double click. After installation of the client, you can start your client and you will see the icon of your openvpn in the taskbar. | ||
| Line 14: | Line 132: | ||
With a right-click on the openvpn-gui icon you can click on connect for connecting to the vpn server. | With a right-click on the openvpn-gui icon you can click on connect for connecting to the vpn server. | ||
--- | |||
You need to download the configurations files ( | |||
=== Linux Debian/Ubuntu OpenVPN Client === | |||
You need to download the configurations files (MP-FW1-TCP4-1194-config.zip) at the end of this tutorial | |||
for debian like Linux open a terminal and type: | for debian like Linux open a terminal and type: | ||
| Line 21: | Line 141: | ||
apt-get update | apt-get update | ||
apt-get install openvpn | apt-get install openvpn | ||
openvpn --config /your/path/ | openvpn --config /your/path/MP-FW1-TCP4-1194.ovpn --ca /your/path/MP-FW1-TCP4-1194-ca.crt* | ||
</pre> | </pre> | ||
Donwload the config files: | Donwload the config files: | ||
https://cin-118-245.medizin.uni-tuebingen.de/index.php/s/wPTcJKVSvMIUmg4 | https://cin-118-245.medizin.uni-tuebingen.de/index.php/s/wPTcJKVSvMIUmg4 | ||
--- | |||
=== Mac OSX Tunnelblick Client === | |||
For downloading a Client for iOS/Mac you can use Tunnelblick:<br> | For downloading a Client for iOS/Mac you can use Tunnelblick:<br> | ||
https://code.google.com/p/tunnelblick/ <br> | https://code.google.com/p/tunnelblick/ <br> | ||
Download the configuration files for Mac Tunnelblick ([https://cin-118-245.medizin.uni-tuebingen.de/index.php/s/wPTcJKVSvMIUmg4 | Download the configuration files for Mac Tunnelblick ([https://cin-118-245.medizin.uni-tuebingen.de/index.php/s/wPTcJKVSvMIUmg4 MP-FW1-TCP4-1194-Viscosity.visc.zip]).<br> | ||
Please extract the configuration to your desktop and doubleclick the Viscosity.visc file. | Please extract the configuration to your desktop and doubleclick the Viscosity.visc file. | ||
| Line 38: | Line 160: | ||
You have now access to all servers with http, samba or ssh.<br> | You have now access to all servers with http, samba or ssh.<br> | ||
--- | |||
=== How I connect to my computer === | |||
If you want access to your office computer via Remote Desktop, then we must activate it for you.<br> | If you want access to your office computer via Remote Desktop, then we must activate it for you.<br> | ||
Send your computer name to [mailto:support-mp@medizin.uni-tuebingen.de support-mp@medizin.uni-tuebingen.de] (you find your computer name on a red label) | Send your computer name to [mailto:support-mp@medizin.uni-tuebingen.de support-mp@medizin.uni-tuebingen.de] (you find your computer name on a red label) | ||
Latest revision as of 18:26, 18 May 2021
! NEW VPN !
Windows 10
- Please click on the network symbol in the taskbar, and on "network and internet settings". It is different if you are connected to a Wifi on the right:


- Select "VPN" and click on the "+" to "Add a VPN connection":

- Please fill in following settings:
| VPN provider | Windows (built-in) |
| Connection name | MP VPN |
| Server name or address | mps-115-104.medizin.uni-tuebingen.de |
| VPN type | Secure Socket Tunneling Protocol (SSTP) |
| Type of sign-in info | User name and password |
| Username | Fill in your MP Account username |
| Password | Fill in your MP Account password |

- Save your VPN settings and close the settings window. Now you can connect to the MP VPN by simply clicking the Connect button if you open the network icon again:

That's it. You are now sucessfully connected to MP VPN!
---
Helpfully tools (optional)
- You can create a desktop icon for your VPN Connection using the command rasphone.exe -d "MP VPN"
- In case you want to see the network connection in your taskbar you can install the following tool (is an older one but it still runs under Windows 10)
https://www.majorgeeks.com/files/details/vpn_connection_indicator.html
---
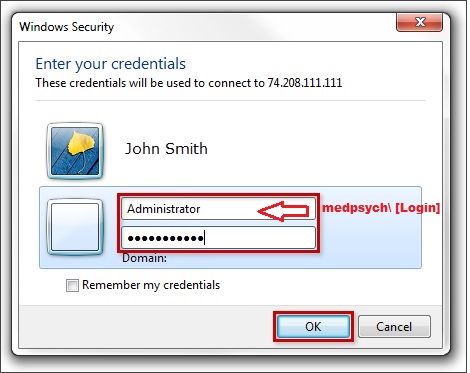
How I connect to my computer
If you want access to your office computer via Remote Desktop, then we must activate it for you.
Send your computer name to support-mp@medizin.uni-tuebingen.de (you find your computer name on a red label)
- start remote desktop
- type your computer name in this field
- click connect
- you can login with your account
- Login: medpsych\ [login]
- Password: [your password]


---
Linux Debian/Ubuntu
coming soon
---
Mac OSX
- Click on your network symbol in the taskbar. And then on "Open Network Preferences..."

- Now click the small "+" symbol to add a new connection:

- Here select "Interface", "VPN Type" like below and name it MP VPN. Then click on "Create":

- Now enter the server address: mps-115-104.medizin.uni-tuebingen.de and your Medpsych username:

- Click on the same page on "Authentication Settings" and enter your Medpsych Password and use for the "Shared Secret": vpn2mp

- Click OK in the Authentication Settings and open the "Advanced" page. Check here if the checkbox "Send all traffic over VPN connection" is checked. If not click it once. Then click on OK.

- Apply all settings. And then you can click on the "Connect" button to connect to the MP VPN.

That's it. You will see a the State: "Connected" at the top. You are now sucessfully connected to MP VPN!
Name resolution (optional)
- If you need name resolution inside the MP network to use DNS names of servers instead of IPs, you have to add the MP search domain to the vpn connection.
- Disconnect from VPN and go to the Advanced page and click on DNS.
- There you can add on the right side with the small "+" icon an new search domain. Enter: medpsych.uni-tuebingen.de
- Click on ok and you should be able to connect again to the MP VPN, now address resolution should be possible. You can use server names instead of just IPs now.
---
Other Operating Systems
CIN VPN is also possible on other operating systems. Please check out the manuals here and use the settings from MacOS above (Shared Secret is always: vpn2mp):
old VPN
Windows OpenVPN Client
Choose the setups for your Windows
- for Windows 7/8/10 -> openvpn-MP-FW1-TCP4-1194-install-2.4.7-I603.exe
- for MAC OS -> MP-FW1-TCP4-1194-Viscosity.visc
https://mps-115-100.medizin.uni-tuebingen.de/index.php/s/ESOP5bQMRcopd2r
Install the client with double click. After installation of the client, you can start your client and you will see the icon of your openvpn in the taskbar.
Please be sure you run the OpenVPN Client as Administrator !!!
On Windows you can right click the OpenVPN-GUI Icon and select "Run as Administrator"
With a right-click on the openvpn-gui icon you can click on connect for connecting to the vpn server.
---
Linux Debian/Ubuntu OpenVPN Client
You need to download the configurations files (MP-FW1-TCP4-1194-config.zip) at the end of this tutorial for debian like Linux open a terminal and type:
apt-get update
apt-get install openvpn
openvpn --config /your/path/MP-FW1-TCP4-1194.ovpn --ca /your/path/MP-FW1-TCP4-1194-ca.crt*
Donwload the config files: https://cin-118-245.medizin.uni-tuebingen.de/index.php/s/wPTcJKVSvMIUmg4
---
Mac OSX Tunnelblick Client
For downloading a Client for iOS/Mac you can use Tunnelblick:
https://code.google.com/p/tunnelblick/
Download the configuration files for Mac Tunnelblick (MP-FW1-TCP4-1194-Viscosity.visc.zip).
Please extract the configuration to your desktop and doubleclick the Viscosity.visc file.
After a few seconds after connecting you will be asked for your username and password. Login with your MEDPSYCH user account!.

And again after a few seconds you will get an IP from the CIN network and you are connected to the network.
You have now access to all servers with http, samba or ssh.
---
How I connect to my computer
If you want access to your office computer via Remote Desktop, then we must activate it for you.
Send your computer name to support-mp@medizin.uni-tuebingen.de (you find your computer name on a red label)
- start remote desktop
- type your computer name in this field
- click connect
- you can login with your account
- Login: medpsych\ [login]
- Password: [your password]