Orientation
Stimulus
Setup 1 and setup 3 have different stimulus orientation. The following two stimuli can get used to test the stimulus orientation on a setup. File:Test orientation.zip
In 2022, the orientation of the stimulus as seen by the retina were as follows:
Setup 1:
- MB0_deg: goes from front (ventral / curtain) to back (dorsal)
- MB90_deg: goes from right to left
Setup 3:
- MB0_deg: goes from back (dorsal) to front (ventral / curtain)
- MB90_deg: goes from right to left
If you design a stimulus in QDSpy you can check its orienation by playing these stimuli and your stimulus.
Per default the stimulus will look as follows in QDSPy on your own screen:
- MB0_deg: goes from right to left
- MB90_deg: goes from bottom to top
Here are visual explanations on how your stimulus will therefore look on the retina:
Setup 1:

Setup 3:

Igor
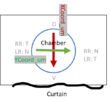
Igor (ScanM) will save the absolute positions of the recording in XCoord_um and YCoord_um. This is how these axes are relative to the chamber and retina;

So if you subtract the position of the optic-disk to go from absolute values for XCoord_um and YCoord_um to relative values rel_XCoord_um and rel_YCoord_um:
- rel_XCoord_um < 0 means dorsal
- rel_XCoord_um > 0 means ventral
- rel_YCoord_um < 0 means temporal (right retina) or nasal (left retina)
- rel_YCoord_um > 0 means nasal (right retina) or temporal (left retina)
If you open a ScanM file in Igor on your computer and display it with e.g. Automated Cell Lab, it will look something like this (the colormap and contrast will be different per default). The center coordinates (which is also the stimulus center) will be like this. Note the flip of x and y and the signs:

In the setup rooms there is another flip of left and right to align what you see on the screen with the chamber: On the setup PCs (setup 1 and setup 3), the light artifact will appear on the right, whereas the light artifact will be on the left if you open the files on your PC.
